
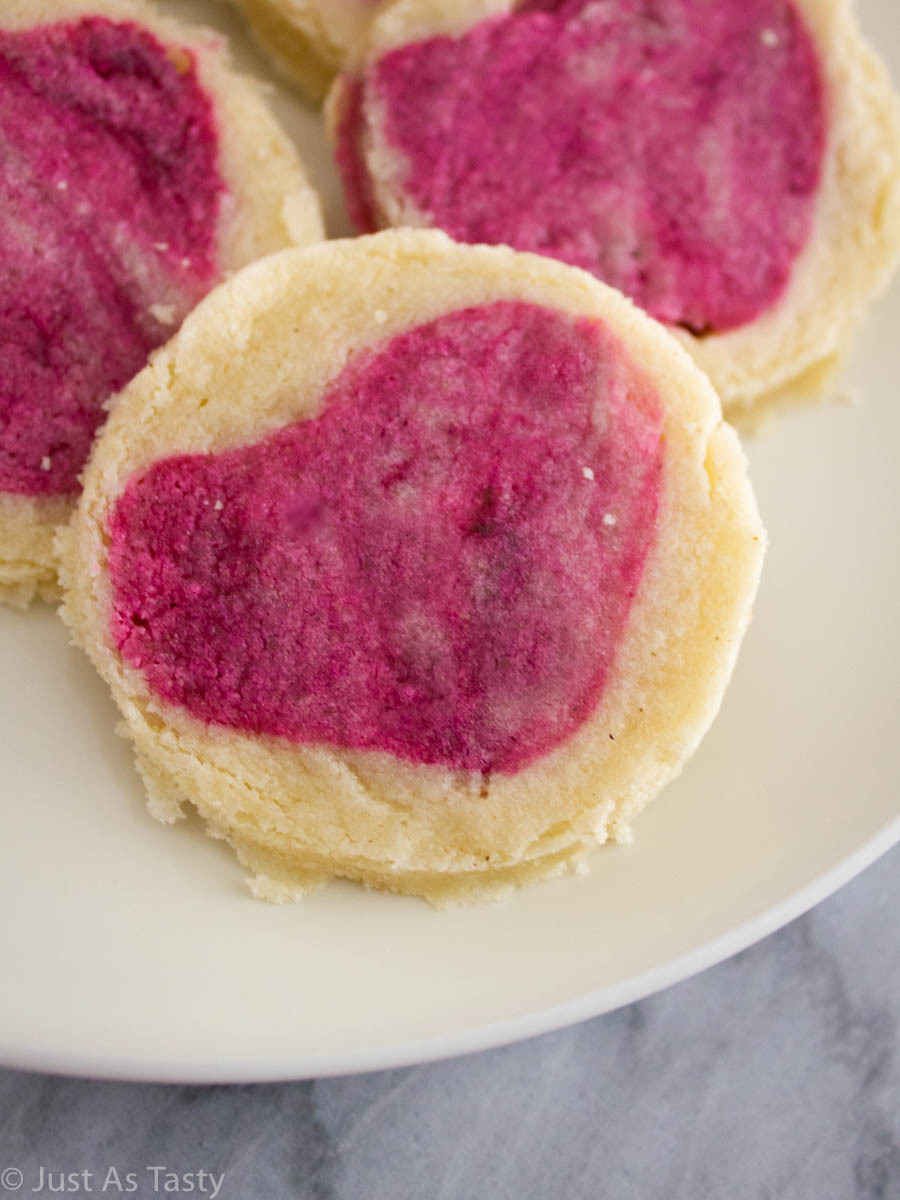
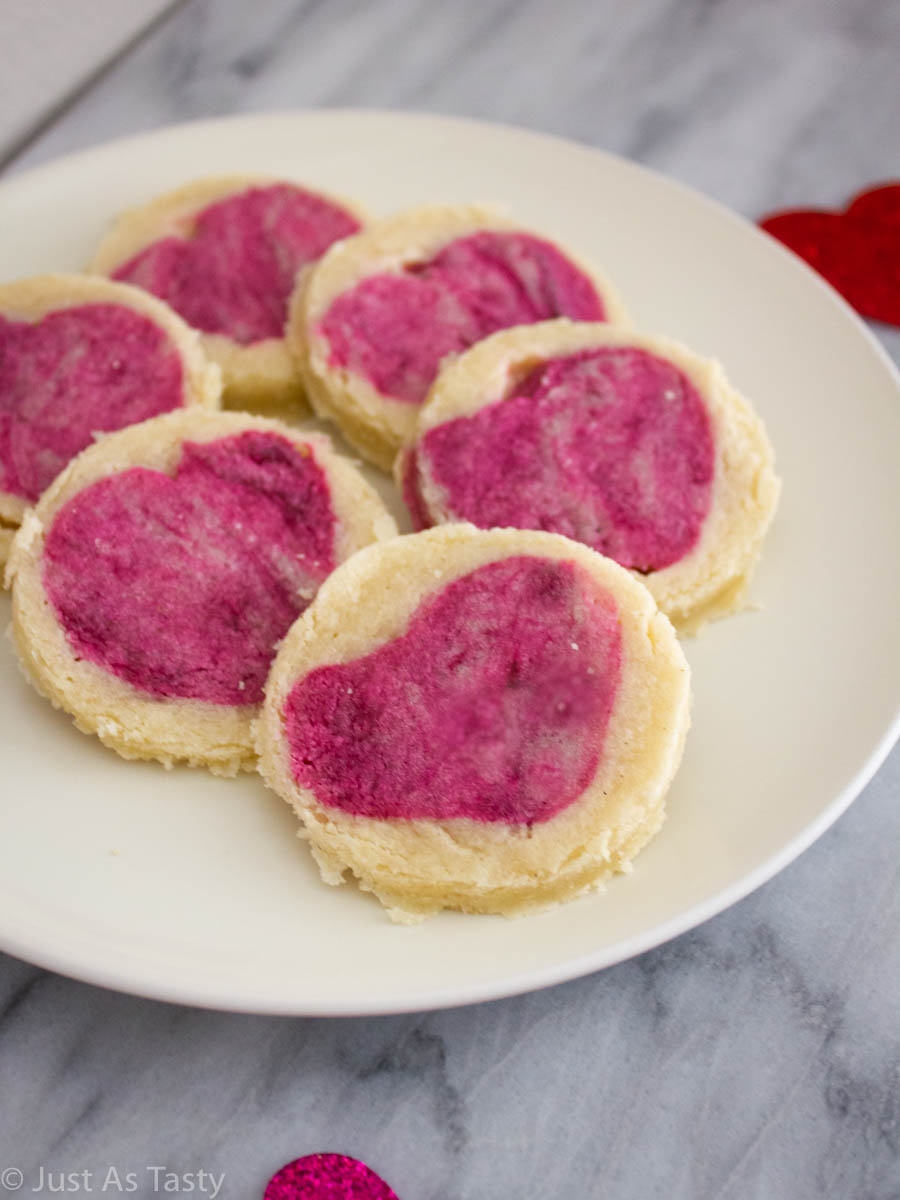
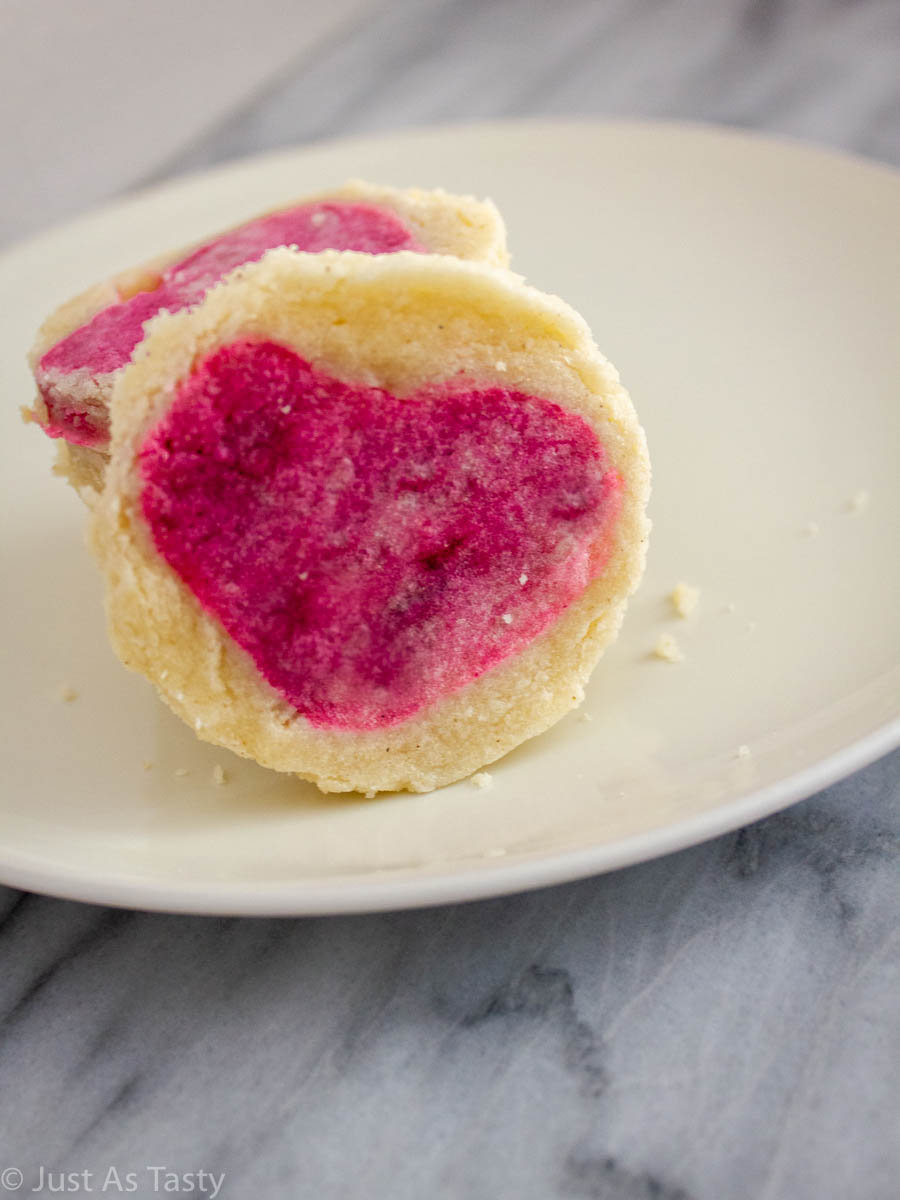
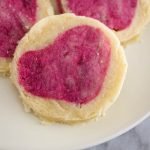
These slice and bake sugar cookies feature a design in the center for a fun surprise! They're super soft and made with just a handful of ingredients.
When I was younger, my mom used to buy those ready-to-bake Pillsbury sugar cookies with the designs on them for a special treat around the holidays. You know the ones. Little orange pumpkins for Halloween, Christmas trees and snowmen for Christmas. I used to think those cookies were so much fun. So, those cookies are what inspired this gluten free slice and bake cookie recipe.
If you've ever wondered how to make your own sugar cookies with designs in the center, I've got you covered! It might seem intimidating and challenging, but I am going to talk you through it. I recommend reading this post and recipe all the way through before getting started, just so you know exactly what you will be doing. And if you're looking to round out your Valentine baking, be sure to check out my cream cheese sugar cookies and my strawberry cupcakes!
In this case, I decided to make Valentine sugar cookies with a little pink heart in the centers. It goes without saying, you can use any color and shape you'd like. The process will be the same regardless of what holiday you're baking for, or what cookie cutters you are using. So let's get right to it!
Why You'll Love These Slice And Bake Sugar Cookies...
- I mean, just look at them! They're so fun, creative, and I guarantee everyone will be asking you how you made these slice and bake cookie designs from scratch.
- These gluten free Valentine cookies are seriously soft and so delicious. The recipe is similar to my chocolate dipped shortbread cookies, but with an extra special ingredient to make these even softer.
- You probably already have all of these ingredients in your kitchen right now!
What You'll Need...
- The dry ingredients: flour + salt.
- The fat: unsalted butter + a bit of cream cheese (which also makes these cookies extra soft AND binds the dough together in the absence of eggs).
- The flavor: sugar + vanilla extract.
- For the design: gel food coloring.
How To Make Slice And Bake Cookies With Designs...
To make these gluten free slice and bake sugar cookies, you will start by creaming your butter and cream cheese with the sugar until it's nice and smooth. Add the vanilla extract and give it another good mix.
Now, add your dry ingredients right into your mixer and mix on low speed until it's all nice and incorporated. That's it! There's your cookie dough.
Now comes the fun part. Separate out about a third of the cookie dough into a smaller bowl, and add as much gel food coloring as needed to achieve the color you're looking for.
Once you're done tinting the dough, transfer to parchment paper and roll out slightly. You want the dough to still be somewhat thick so no need to roll too much. If your dough has gotten too soft and pliable, now is the time to pop it in your refrigerator to chill for 20-30 minutes before cutting into shapes.
After chilling the dough, cut your shapes using a small cookie cutter. I used the small heart shape out of this set. Use up as much of the dough as you can. Once you have all of your shapes, gently stack them up (see photo below for reference) to form a log.
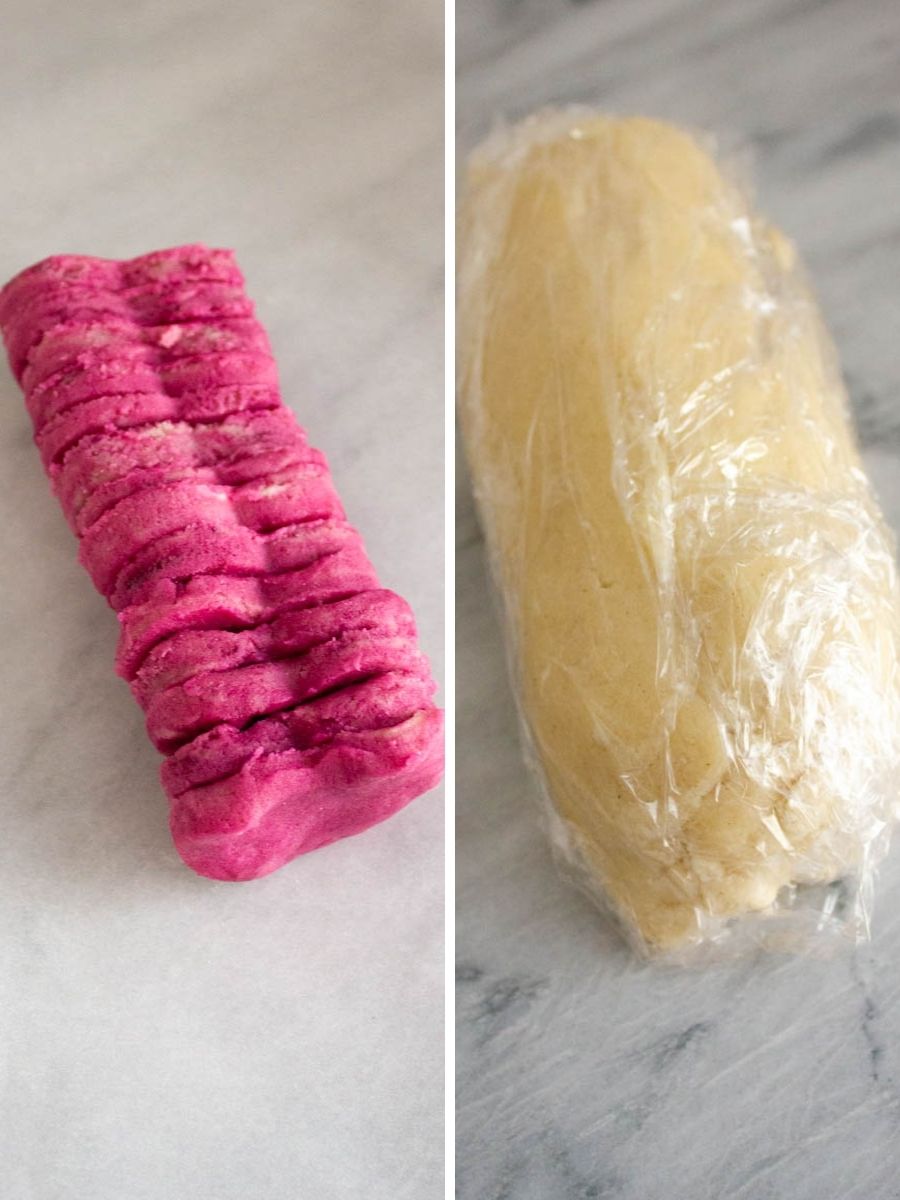
Roll out the rest of your dough and slice it into 4-5 fairly large strips. Place the "log" of tinted dough right on top of one of the strips, then gently form the remaining strips all around to cover it. You do need to be careful here when molding the dough around the shapes, otherwise the design may not stay in tact.
Now this part will take a bit of patience but I promise it's worth it! Wrap the whole thing up in cling wrap and chill in the refrigerator for at least 2 hours, but I like to leave it in overnight.
Slice up your cookie dough, arrange on a baking sheet, and bake for just about 10 minutes.
Tips For Getting The Perfect Slice And Bake Sugar Cookies...
- Make sure you're using room temperature ingredients, and measure your flour properly. Accidentally using too much flour will result in dry and crumbly dough. I always recommend using a scale if possible, but if you are using measuring cups, spoon the flour into the cups and level it off vs. scooping it out of the bag or container.
- I've found that sometimes it's easier to use my clean hands to really incorporate the food coloring into the dough. Just be aware that the more you work the dough with your hands, the softer it will get. But don't worry! I've got a fix for that. See next tip...
- While technically it's an optional step, I do always opt for chilling the tinted dough right before cutting the shapes. It just makes it so much easier to work with. If the dough is too soft, it will just fall apart on you when trying to stack your shapes.
- One hack I like to use to get perfectly round slice and bake cookies: after they come out of the oven, while they're still somewhat warm, I use the rim of a clean glass (or you could use a round cookie cutter) to gently reinforce the round shape of the cookies. And then I just snack on the edges 😉
📖 Recipe
Slice & Bake Sugar Cookies - Gluten Free, Eggless
Ingredients
- 2 cups (296g) gluten free flour blend
- ½ teaspoon salt
- 1 cup (226g) unsalted butter room temperature
- 2 ounces cream cheese room temperature
- 1 cup (200g) granulated sugar
- 1 teaspoon vanilla extract
- gel food coloring
Instructions
- In a medium bowl, whisk the flour and salt together. Set aside.
- Using a hand mixer or a stand mixer fitted with the paddle attachment, cream the butter, cream cheese, and sugar until smooth. Add the vanilla extract and mix to combine. Gradually add the flour mix in, beating on low speed until cookie dough forms.
- Separate out ⅓ of the cookie dough and place in a separate bowl. Use gel food coloring to tint this portion of dough until desired color is achieved. Transfer tinted dough out onto a piece of parchment paper and roll to about 1" thick. Use a small cookie cutter to cut out shapes, re-rolling scraps until all of the tinted dough is used up.
- Gently stack the shapes on top of one another, then place on its side to form a log. Set aside.
- Transfer the rest of the cookie dough onto a clean piece of parchment paper. Roll out dough to about 1" thick. Slice into 4-5 large strips.
- Place the tinted log of dough right on top of one of the strips of the plain dough. Use your hands to gently place the strips all around, covering the tinted dough completely, but try to keep the shapes in tact. Wrap cookie dough tightly in cling wrap. Refrigerate at least 2 hours, or overnight.
- When ready to bake, preheat oven to 350°F and line a baking sheet with parchment paper. Remove dough from the refrigerator and slice into ½ in. slices. Arrange on prepared baking sheet, about an inch apart, and bake for 10-12 minutes. Allow cookies to cool completely before removing from baking sheet.
Notes
- If the dough is too soft to work with, chill in the refrigerator for 20-30 minutes AFTER rolling but BEFORE cutting into shapes.
- I highly recommend gel food coloring over liquid, which is less potent, so you will end up needing a lot more of it for a deep color.
Did you make my slice and bake sugar cookies? Leave me a comment below or tag me on Instagram @justastastyblog and #justastastyblog!

Leave a Reply